Free-standing, espalier, fan, cordon, stepover
This article provides information on shaping fruit trees in some of the most popular formats, with step-by-step instructions and diagrams.
- How to train free-standing fruit trees
- How to train espalier fruit trees
- How to make an espalier apple tree
- How to train fan-shaped fruit trees
- How to train cordon fruit trees
- How to train stepover fruit trees
- How to train apricots as fan-shaped trees
There are several ways of training fruit trees. For all, the basic principle is to shape the tree to optimise the arrival of light on the leaves, and to place the fruit in a position where it can be harvested easily. Free-standing trees require more space. Espaliered trees, or fans or cordons are more compact, and they are ideal where space is restricted. Stepover trees can be thought of as one-tier espaliers, reaching perhaps a couple of feet in height, suitable for edging a bed or lawn.
Rootstock for espalier fruit trees
Rootstocks for espalier apple trees
The rootstock to be used for espalier-trained apples could be EMLA 9, EMLA 26 or MM106.
EMLA 9 and EMLA 26 both require excellent soil conditions. MM106 is more suitable where the soil quality is less than average. In this case, the more vigorous rootstock MM106 makes training possible, provided that sufficient growth is created every year. However if MM106 is used as a rootstock on deep soils, with a pH of around 6, then in many cases it is too strong with respect to the number of vegetative shoots required. In this case, it is possible to use MM106 effectively, provided that the height of the espalier can be increased to at least 10 feet. In this arrangment, a lot of energy is required to feed the extra espalier layers compared with the weaker rootstocks EMLA 26 and EMLA 9. For successful development of espalier trees, a regular supply of water throughout the summer is essential.
Rootstocks for espalier pear trees
For pears, the two most common rootstocks are Quince A and Quince C. On high-quality soils, rootstock Quince C is very successful. Quince A is more powerful and therefore more difficult to handle.
Rootstocks for espalier cherries
Cherries can be grown successfully as espaliers. There is a choice of two rootstocks. The first is Colt, and an espalier on this rootstock can be trained as a fan against a south-facing wall, up to a height of 8-10 feet. It will start croppning after the fourth year. It is suitable where the soil is of lower quality and with a lower degree of water retention. For dessert cherries in particular, Gisela 5 is an excellent rootstock. However, cherries with this rootstock require top quality soil and a good availability of water throughout the growing season.
When growing cherries in an espalier, netting the trees against birds is relatively easy. However, wasps can be a real pest for ripening cherries. If wasps are a problem, it is worth using netting with a narrow spacing to ensure that wasps cannot get through the netting.
Rootstocks for espalier quinces, plums and greengages
As regards quince, plum and greengage, in my experience these are too complicated to train as espaliers. It can be done, but they require a lot of management to achieve success.
How to train free-standing fruit trees
A fruit tree consists of a rootstock, onto which the fruit variety is grafted. The best rootstock for the average garden is MM106, but if space is limited, M26 may be more suitable. In fact the rootstock determines the final tree size.
It should be remembered that different fruit varieties generate differing tree shapes. For example, apple trees are naturally more spreading, while pears and plums tend to be more vertical in their growth
Free-standing fruit tree – first year after planting
 If the tree has been properly planted, and grass and weeds are kept at bay in the area in which tree roots are trying to become established, new shoot growth should appear during the summer months (the tree will have been planted during dormancy, from December to March). This new shoot growth is the material available to form the tree’s permanent framework as shown in the diagram. Shoots 1, 2 and 3 are new shoots. Shoots 4 and 5 are those already present on a 2-year old tree when planted.
At this early stage, pruning should be absolutely minimal, because pruning delays cropping. Minimal pruning is recommended for years 1, 2 and 3 after planting.
Free-standing fruit tree – second year after planting
 These operations should be carried out in the period from December to March. Branches 1, 3 and 6 in the diagram should be tied down and spaced out using string running from the base of the stake. The leading branch 2 should be left upright. Branches 4 and 5 are tied down almost flat, and they will become the first cropping wood.
Framework branches 1, 3, 4, 5 and 6 should be pruned only if growth has been weak. In this case, they should be cut back by a third of their length. The central leader should be pruned so that it is no higher than the length of a secateur above the average height of all the upright branches.
Free-standing fruit tree – third year after planting
 As shown in the diagram, continue to build the crown of the tree by spacing the branches for maximum light utilization, again by tying down branches. The tree will now be cropping. Watch a video on how to tie down branches.
How to train espalier fruit trees

The espalier is a useful method of training fruit trees, and it is becoming increasingly popular in the garden because it is ideal for positions adjacent to a wall or a fence, and occupies a minimum space. It can also be used as an attractive separation or screen between different parts of a garden. In the espalier fruit tree system, the tree comprises a central stem and horizontal fruiting branches. It is very important to train the tree correctly in order to achieve a tree that produces good fruit on all the horizontal branches for the next 20 years or so.
North-facing walls are only suitable for Morello acid cherries or damsons. Pears need a higher input of warmth compared with apples. A south-facing aspect is best for pears.
Do not train the branches – bringing them down to a near horizontal position – until the sap in the tree is running vigorously. This means that training can be performed from around mid-May.
Frequent watering and mulching are essential as south-facing positions can get very hot at the height of the summer months. A south-facing wall is also suitable for peaches, nectarines, plums and apricots.
Next, one has to decide about the support system used in such situations; if it is a wall then the height of the wires is important. If it is a fence, then the spacing of the supporting stakes is also of importance.
Planting distances for espalier fruit trees
For example, with espalier apples, you first have to make up your mind whether you want to grow your trees on M26 or on MM106 rootstock. M26 (a rootstock that creates a weaker tree) will need a stronger support system compared with MM106 trees.
For espaliered apples on M26 rootstocks, the planting distance should be 10 feet, with the union just 2” above soil level. No more!!
For espalier apples on MM106 rootstocks, plant 12–14 feet apart. The union can be any height above soil level.
The stakes will need to be 8’ tall and 1’6” in the ground. Only if your soil is very sandy, your stakes will need to go 2 feet into the soil.
Space the stakes at the same distance as you space the trees. Make sure the stake wood has been treated against wood rot fungi.
Another important point: install the first wire only after the trees have arrived. All trees are different and so the height of the first wire from the ground can vary from 40 cm to even 70 or 80 cm.
It is likely that the first wire will be 15 to 18 inches height above soil level, to coincide with the natural side branches of trees, already formed.
Moreover, to put the first wire at 12” above soil level is a mistake, as fruit rot can be a major problem due to soil splashing during heavy rainfall.
If the soil quality is really good, then I would plant trees on M26, three meters apart.
If there is any doubt about the depth of good dark, well aerated earth, then plant FERTILE apple varieties on MM106, four meters apart. The fruit variety choice will be critical, to avoid excessive wood growth in later years. Peaches, plums, nectarines and apricots can also be spaced four meters apart. Read more about soil for fruit trees.
How to train espalier fruit trees – first year of training
 In the first year of training, you will form the first tier of the espalier, and therefore you will create a tree with three branches: the two side branches, and the upward leading branch. In mid-May, tie the two lower side branches to an angle of about 60 degrees (from the horizontal). The first two branches will be anything from 40 cm to 75 cm above soil level, depending on the variety, purpose and positioning of the tree. At this stage, you can remove all other competing branches from the tree, so that growth will be concentrated in the three branches you need (fig. 4).
Wait until the second week of August, and only then, lower the two side branches to the horizontal. This delay in timing is very important. If you lower the branches to the horizontal position too early in the growing season, the upright vertical leading branch will absorb all the nutrients and the first tier of the espalier will be too weak in future years.
 During the last week of August, remove all surplus upright growth from the espalier framework. Then cut a notch in the upright branch above the first horizontal tier, at a height corresponding to where you would like the next tier to be formed the following year. This is usually about 18 inches above the first tier. The depth of the notch should be about a third of the thickness of the upright branch. It stimulates the tree to produce branches at exactly that point. Please note that the measurements on Fig. 5 are approximate, and as mentioned above, will vary according to variety, purpose and position.
How to train espalier fruit trees – second year of training
 The following year, build the next layer of the espalier, following the same routine as the previous year (fig. 6). Prune in spring as shown in fig. 6.
How to train espalier fruit trees – third year of training
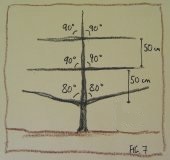 The following August, establish the final tier of the espalier, selecting two branches and training down to a 90-degree angle (fig. 7).
The tree should be fertilized with a tree feed such as “Growmore”, following the instructions on the package. Spread the product evenly over an area of 3 square feet around the trunk .
During the growing season (May-October), keep the area under the tree canopy free from weeds, and from grass in particular.
Only prune in the winter once the tree is in full production and therefore is in need of spur replacement.
A common mistake, and one that can have serious consequences, is forcing the tree to grow upwards too quickly, without giving enough time to properly establish the lower limbs of the espalier. The most useful espalier which requires least maintenance in later years, is a tree in which the diameter of the lower arms are of double thickness compared to the top arms of the espalier. Good quality fruit is then produced at all levels of the espalier, and not just on the top layer.
This can be achieved by means of skilful pruning, bearing in mind that shoots in an upright position always grow more strongly than more horizontal ones.
How to plant pre-trained espalier trees
Some nurseries sell 2 or 3-year old fruit trees already trained into the espalier format. Here are the crucial steps to be followed for successful planting and to ensure that the trees retain their structure and continue producing high quality fruit for at least another 35 years.
- Plant each tree, without carrying out any further shaping or bending at this moment of time. Do not remove the bamboo frame until the end of July.
- In July, tie the first tier branches at the correct angle to the horizontal wires which have been fitted to your wall or fencing panels.
- Apply a spiral plastic anti dog, cat and rabbit guard to each tree.
- Dig a planting hole of 50 cm diameter and of spade depth.
- Loosen the subsoil with a rigid tine fork.
- Plant the tree upright, ensuring that the union of the tree is no more than 4 cm above settled soil level.
- Only use John Innes compost number 3 as the soil in which the roots will start their new life.
- Tie the tree to an upright 5 cm diameter, circular section stake, treated against wood rot, if no horizontal wires are in place. The stake needs to be 1.80 metres in length.
- When further branch adjustments are necessary, use flexible rubber tying material, with no risk of growing into the wood.
- Keep the trees free from grass and weeds for an area of at least one square metre around the tree trunk.
- Apply “Growmore” twice a year, in March and November. Follow the instructions on the packet.
- Water the trees weekly with 6 litres of water each, from early April to the beginning of September.
- Carry out summer pruning, not winter pruning, on espalier trees.
- Fruit trees love organic matter as a mulch. Keep the mulch weed free and supplement it with further mulch when part of it has rotted away.
How to fan train fruit trees
Morello cherries, plums, peaches, nectarines and apricots, so-called stone fruit trees, are often more suited to fan training than espalier or open bush patterns. This to a degree depends on the vigour of the trees and the place where they are going to be planted.
The fan is really a variation on the espalier, except that instead of being held horizontally, branches are trained into a flat fan shape, with two main branches growing outwards at 45°. This angle makes it easier to control growth, when compared with the espalier. In addition, over a number of years the number of branches in the fan can reach from 8 to 10, ensuring good light penetration into the tree structure.
If the tree you are using is a one-year old tree, cut it back to 15 inches above soil level. This should be done in February/March. Remember to seal the pruning cuts with a sealing compound to prevent infection by the spores carrying various tree diseases.
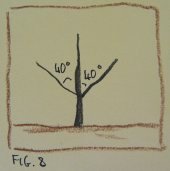 In early June (see fig. 8), select two strongly-growing shoots, close to the tip of the tree, and tie them to canes set at an angle of 45 degrees. Remove all other shoots. Always use bio-degradable tying materials, to prevent the risk of the ties growing in and strangling the two selected branches. As the two branches develop further during the growing season, tie them again along the upper part of the bamboo canes.
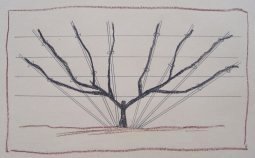
 If the two trained branches have grown well, in the following February, cut both branches back to twelve inches from the point where they started to grow last February (fig.9). This will provide in total 10 buds, which we will now use to develop the main frame of the fan shape. New shoots will start to grow from these buds. Select four shoots on each side of the fan and tie them again on bamboo canes set out in such a way that they fill the fan space over the 180-degree arching area available (see fig. 10 below). However, leave the centre of the fan unoccupied, in order to maintain good growth in the basic framework.
 Once this has been successfully completed, cropping will follow, mainly on one year-old wood. Once that wood has carried a crop, it needs to be cut out to make room for the new one year-old wood. The best time to do this is not during the winter months, but immediately after the crop has been picked. If any sub laterals develop, cut them back to 3 to 4 inches, if there is room available.
How to train cordon fruit trees
Where space is limited, most apples and some pear varieties are suitable to be trained as cordons. A cordon is a tree planted at an angle of 45 degrees, supported and trained along a fence or a wall. Along the wall or fence, horizontal wires are positioned at a height of approximately two, four and six feet. A six-foot bamboo cane is fastened to the wires at a 45-degree angle, at two-foot intervals. These trees are based on the maintenance and supply of short laterals along the main stem of the tree. The first laterals should be in place at approximately 40 cm above soil level. It is essential that the union of the tree is 1.5 to 2 inches above the soil level. For very deep and fertile soils, the M9 rootstock is suitable. However for most situations, M26 is the best rootstock for a cordon tree. On very hungry soils, it might be possible to use the stronger stock MM106 to good effect.
Planting cordon fruit trees
Plant the trees 60 cm apart after having made sure that the soil does not lay wet during the winter or summer months. If drainage is faulty, the trees will suffer badly from tree canker. As a result, the life of the tree is short and the fruit will have a short shelf life. It is also essential that the soil is well prepared in advance, during September and October, while the soil is still warm and friable. Dig over, for each tree, an area of at least 60 x 60 cm. Before you add the essential organic matter such as well rotted farmyard manure to the soil, make sure that the subsoil is well loosened with a rigid tine fork, so that water can always drain away quickly. Tree roots need lots of oxygen and where water is standing around the roots, oxygen is not available. The trees literally suffocate, if this is not corrected!
Pruning cordon fruit trees
Summer pruning is essential to ensure that the tree stays within the limited space available.
Pruning must not be carried out during the late autumn or winter months. The cordon tree performs best when pruned during the summer months. The first pruning should be performed by the middle of July in the south of England. For the middle and north of England, start pruning seven to ten days later. Cut all the newly-formed shoots back to five leaves lengths. One newly-formed shoot per growth point is enough. When doubles occur, bring them back to single shoots. By the middle of September, cut the same shoots back to three-leaf lengths. As sub-laterals are formed in later years, cut these back to one leaf lengths. The aim is to create strong fruit buds on two to three-year old wood, as well as spurs. These well-budded-up lengths of wood can be up to nine inches long. Leave these lengths of wood intact as fruit buds will have formed along these two-year old shoots. Some varieties will produce fruit on one-year old wood. All the same, in order not to exhaust the trees, it is best to halve these shoots by the first week of June. Thin the fruits to one fruit per cluster. The fruits will have to be spaced six inches apart to form good-sized fruits.
When the cordon has reached the top wire, it is important to make sure that all new growth does not occur at the top of the tree only. To that effect, lower the complete cordon, initially to a 40-degree angle. In later years, it is possible to lower it to the final angle of 35 degrees. As the trees become older, thin out the fruit spurs and encourage new replacement wood to form in its place.

Please note that the diagonal ochre posts shown in the drawing above are in fact 1.80 metre lengths of bamboo canes. The trees need to be tied to these canes, firstly because it is essential to maintain the 45 degree angle. This can later be lowered to 35 degrees, if growth is unevenly spread over the total length of the tree. The bamboo canes are also used because trees tied to wire are at risk, because the trees can very easily grow into the wire, which can cause severe damage to the trees, resulting in canker and branch breakages. In addition, it is important that the union of the trees is at least 4 cm above soil level.
Important points in training cordon fruit trees
- Trees can be contained in growth by using dwarfing rootstocks, if available. But this should be accompanied by the correct application of the summer pruning principles. Winter pruning must be omitted, except the cutting back of the leading shoot, when it has grown too long.
- Plant the trees at a 45 degree angle. Fasten the trees to 6-foot long strong bamboo canes. These canes themselves are held in that position with the aid of three horizontal wires, which are strained between two strong end posts.
- Maintain an adequate moisture level in the root zone of the trees during the growing season. Also make sure the union of the trees are approximately 1.5 inches above the soil level.
- Avoid over-cropping by carrying out fruit thinning by the middle of June. This applies after the trees have been 2 years in the ground.
- The worst pest is aphids. Easy to control if done early. Once the leaves have curled up it is too late. Keep your eyes on the trees during spring and early summer.
- Watch out for any holes in the new leaves. Remove caterpillars as these spread out, and go on to damage more leaves.
- If there is a lot of rain in spring, early new growth of laterals and sub laterals may be strong. Pinch out the growing tip of these shoots by mid June. Don’t cut back the central leading shoot just yet. About the end of June is right for the central leader.
How to train stepover fruit trees
There are certain apple varieties which can be used to plant along the edge of a bed, or next to a path. The trunk of the apple tree runs horizontally at something like 8 inches above soil level. The formation of this tree form can be done in various ways. However the most important requirement is that the formation pruning is never carried out during the winter months when the trees are dormant. Various stages of summer pruning are carried out, in order to encourage formation of fruit buds all along the main stem. Secondly, ideally, moderate new growth needs to occur along the whole length of the stem. Depending on the soil depth and soil quality, the rootstock suitable for these types of trees are M9 and M26. Tip bearing varieties are not suitable, nor are very vigorous varieties. Spur type varieties are the most useful ones to use for this type of tree.
Good results have been achieved by the use of the following varieties: James Grieve, Katy, Greensleeves, Egremont Russet, Lord Lambourne, Ellisons Orange, Sunset, Pixie, Red Pippin, Red Falstaff and Royal Gala.
Watch a video about how to train a stepover tree.
Stepover tree, how to create the structure
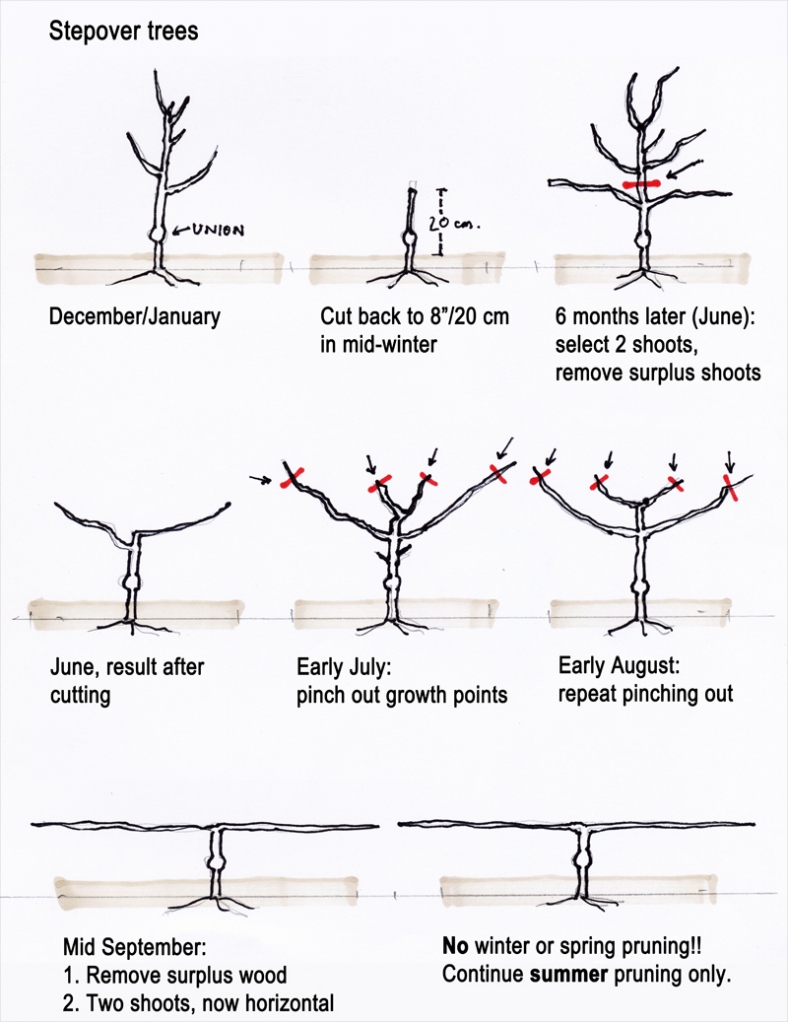
Always make sure the union of the tree is at least 3 inches above soil level. As the union of the tree will greatly swell in size over time, the risk of scion rooting should not be underestimated
Ideally the two newly-formed main branches should be of the same thickness and the same length. This can be achieved by pruning the tree back, after it has been planted, at a height of approx. 10 inches. Of the new growth appearing in the early summer months, two shoots running parallel with the edge of the bed, need to be selected and the remaining shoots rubbed out, early during the growing season, early in June. These two shoots should be left to grow, uncut, but gradually lowered to a final horizontal position by the end of September.
The following season you will see new growth appearing all along the horizontal branches. It is very important to pinch out the growing tips of the newly forming shoots as soon as 6 inches of length has been established. By the middle of July these shoots are cut back again to 4 inches. New growth will occur again. The shoots are now cut back again, by the middle of September to 2 inches in length. All being well, fruit buds have now been formed along the base of the main horizontal stem.
The trick is to make sure these fruit buds set fruit the following season. This can be achieved by making sure good cross pollination occurs every new season. For that reason two compatible diploid varieties need to be planted. The stepover trees should be planted approximately 5 to 6 feet apart, depending on the quality of the soil and the rootstock used.
How to grow stepover trees in containers
There is another method of growing stepover trees. I have often seen heavily laden mature fruit trees that have been blown over by strong gales, level to the ground. As long as 10% of the roots are still undamaged, these trees may start a new life, with the trunk actually lying on the ground. This knowledge can be used with good effect for the construction of stepover trees. As long as trees are well watered and fed, sizeable containers can be used, in which two young maiden trees can be planted, WITHOUT HAVING TO CUT BACK THE TREES. It is essential that these containers have large sized drainage holes from which new roots can find their way into the soil. Often the new shoot growth occurring along the full length of these trees, is easier to control, compared with the treatment of the trees as outlined above.
How to fan train apricot trees
Here are the instructions for fan training an apricot tree:
Apricot fan training, February/March
- Start with 2 side branches.
- Cut these back by about 2 inches. Remove all other growth. (March)
- Promote strong growth. (Water, nutrients, warmth).
- Seal all fresh pruning cuts with “Heal and Seal” compound to prevent bacterial canker infection.
Apricot fan training, late September
- Select 2 shoots on either side.
- Tie in with bamboo canes at 45 degree angles
- Cut back the original side branches and the extra 4, by about a third of their length.
- Continue to feed well (slow release fertilizer, Osmacote or the equivalent).
Apricot fan training, February/March of the following year
- Select the final 2 branches.
- Carry out the same procedure as in the previous year.
- After cropping (August), cut out the wood that carried a crop. Tie in new canes to replace the wood that carried fruit. Develop fruit spurs.
- Apricot crops best on younger wood, but it does crop on the older spurs.
- Never prune plums, cherries, apricots, peach and nectarine during the winter months but ALWAYS as soon as you have picked the crop. This to avoid disease build-up.